The previous article introduced the concept of a web-based Shell terminal and the architectural design of OnTheSSH for Web programming. This article will introduce how to connect the web front-end, back-end, and the core modules of OnTheSSH using http technology through a real and usable demo project.
The following figure is the framework of the demo project:
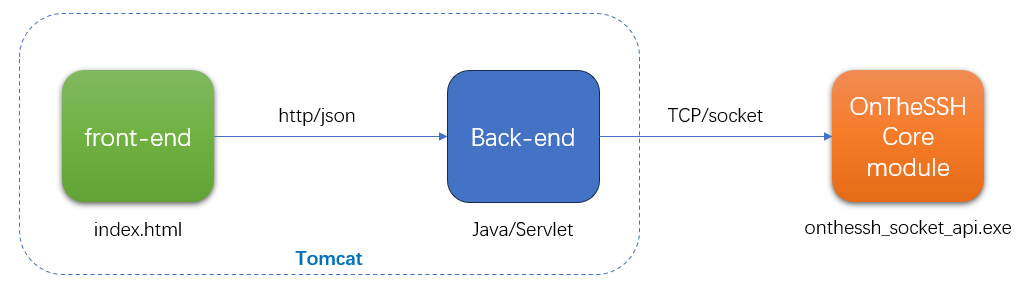
For the purposes of simplicity and teaching, and considering the universal characteristics of the java language, the demo project uses java/servlet and javascript as the main technologies to build the front-end and back-end of the shell terminal. When you develop the project yourself, you can flexibly choose the programming language and technical framework There are currently a great many programming languages and architectures that can be used to implement the Web.
The entire Shell terminal window (foreground) is encapsulated in the index.html file, while the background is composed of multiple servlets. The foreground and background are assembled in a Tomcat project. The core module of OnTheSSH is an exe execution file, and the background Servlet is associated with the core module of OnTheSSH through a Socket.
The demo project can be downloaded here: web_terminal.7z
After decompression, there are three folders:
- apache-tomcat 9.0.6 — Container for running Servlet projects
- java_src — Servlet source code
- socket_api — OnTheSSH Core Module (an exe program encapsulated as a Socket service)
Start
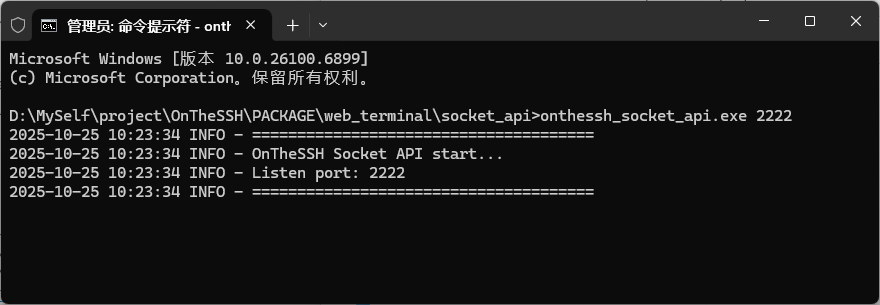
1) Start the Socket service of the OnTheSSH core module:
socket_api>onthessh_socket_api.exe 2222 #2222是Socket服务侦听端口
2) Start Tomcat
# Enter the bin directory of Tomcat
cd D:\MySelf\project\OnTheSSH\PACKAGE\web_terminal\apache-tomcat-9.0.6\bin
# Start Tomcat
catalina.bat run
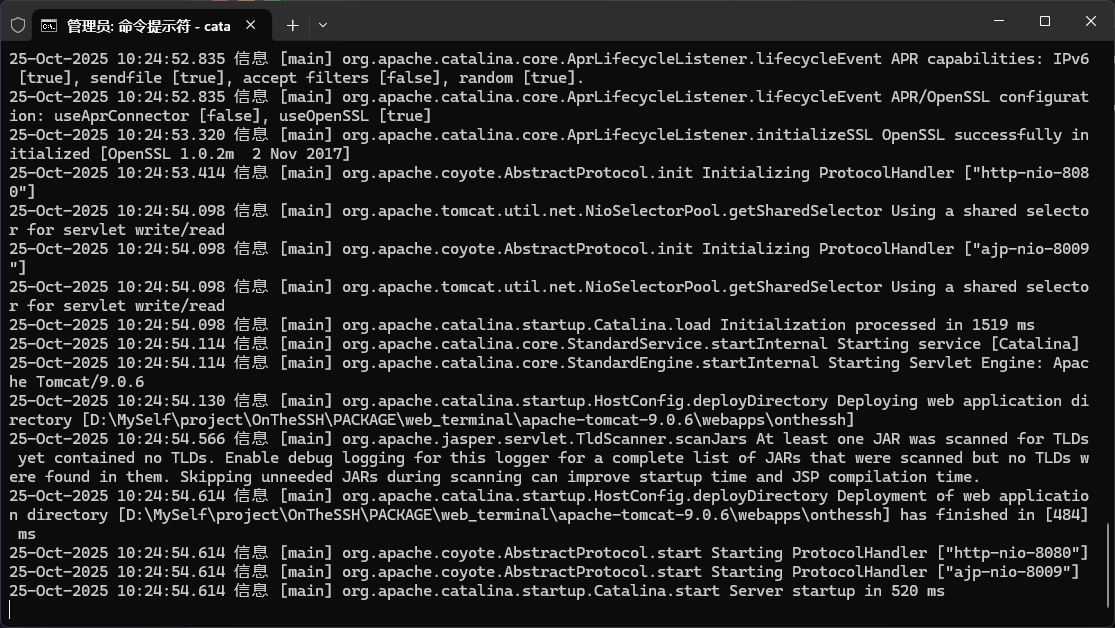
The above picture shows the log output after starting Tomcat. The fourth to last line shows that the demo project (onthessh) has been loaded in Tomcat, and the third to last line indicates that the http service port of Tomcat is 8080.
3) Now it can be accessed via a browser.
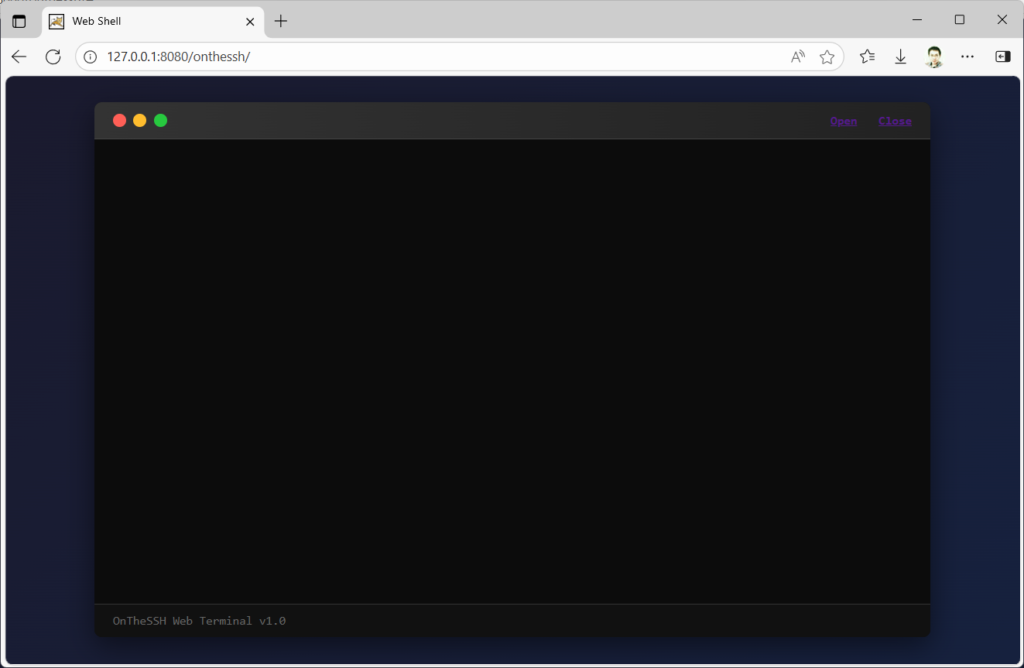
The address 127.0.0.1:8080/onthessh/ in the address bar indicates that the foreground (index.html) of the demo project is being accessed.
Servlet
Servlet is the most original technical framework of the Java language in the field of Web programming. After years of development, the technical framework has been changing rapidly, while Servlet is no longer familiar to most Java programmers. Therefore, here we will provide a detailed introduction to the configuration, deployment of Servlets, and the simple usage of the container (Tomcat) for running servlets.
The directory structure of Tomcat is as follows:
apache-tomcat-9.0.6/
  | -- bin/
  | -- conf/
  | -- lib/
  | -- logs/
  | -- temp/
  | -- webapps/
        | -- onthessh   //demo project
              | -- index.html   //foreground
              | -- WEB-INF
                    | -- classes/  //Background Servlet (compiled.class file)
                    | -- lib/    //The third-party libraries (.jar files) referenced by the project
                    | -- web.xml   //Project configuration (Mapping relationship between Servlet and Url
In the web.xml file, configuration needs to be made for each Servlet. The following code is one of them.
<servlet>
    <servlet-name>OpenSessionServlet</servlet-name>
    <servlet-class>com.onthessh.OpenSession</servlet-class>
</servlet>
......
<servlet-mapping>
    <servlet-name>OpenSessionServlet</servlet-name>
    <url-pattern>/OpenSession</url-pattern>
</servlet-mapping>
OpenSessionServlet is the name of the Servlet, the corresponding class file is com.onthessh.OpenSession, position on the “WEB – INF/classes/com/onthessh/OpenSession.class”. The < Servlet-mapping > tag defines the Url of this Servlet as “/OpenSession”, and the corresponding browser address is http://<IP>:<PORT>/onthessh/OpenSession. Among them, “onthessh” is the name of the demo project.
Analysis of Servlet Source Code
There are a total of 6 Servlets in the demo project, corresponding to 6 Socket service interfaces of the core module. The specific functions and parameters will be elaborated in detail in the next article. Here, we will focus on the code writing form of the Servlet and the details of calling the Socket Still taking the Servlet OpenSession.java as an example:
public class OpenSession extends HttpServlet
{
    private static final long serialVersionUID = 1L;
    private Gson gson;

    @Override
    public void init() throws ServletException
    {
        super.init();
        gson = new Gson();
    }

    @Override
    protected void doPost(HttpServletRequest request, HttpServletResponse response)
            throws ServletException, IOException
    {
        request.setCharacterEncoding("UTF-8");
        response.setContentType("application/json;charset=UTF-8");
        response.setCharacterEncoding("UTF-8");

        PrintWriter out = response.getWriter();

        try
        {
            String reqJson = readRequestBody(request); //read http post body json
            System.out.println("req:" + reqJson);
When writing a Servlet class, it is necessary to inherit from the parent class HttpServlet. In the re-implementation of the parent class’s init() method, the gson variable is initialized. It is used for Json encoding and parsing and is the only external library (jar file) referenced in this demo.
The doPost() method is also a way to re-implement the parent class. From the name, it can be understood that this Servlet only accepts requests in the POST mode. In the method, the request and return character sets (utf-8) of the Servlet are set. The http attribute content-type is set to “application/json” because all the servlets in the demo have request parameters and returned data in Json format.
The readRequestBody(request) in try receives the request data sent from the foreground. Note that the data is not in the commonly used name=value format in POST, but in Json placed in the “body” of HTTP.
// Parse the body json
Map<String, Object> map = gson.fromJson(reqJson, Map.class);
String addr = map.get("addr").toString();
String user = map.get("user").toString();
String passwd = map.get("passwd").toString();
int rows = (int) Double.parseDouble(map.get("rows").toString());
int cols = (int) Double.parseDouble(map.get("cols").toString());

// Build socket json
Map<String, Object> socketMap = new HashMap<>();
socketMap.put("method", "onthessh::terminal::open_session");
Map<String, Object> data = new HashMap<>();
data.put("addr", addr);
data.put("user", user);
data.put("passwd", passwd);
data.put("rows", rows);
data.put("cols", cols);
socketMap.put("data", data);
String socketJson = gson.toJson(socketMap);

String rspJson = socket(socketJson);    //call socket api
out.print(rspJson);
out.flush();
After receiving the Json data, the Servlet cannot directly send it to the core module because it still needs to inform the core module of the purpose of the Json data. Therefore, the data structure sent to the core module Socket service is roughly as follows:
{
    "method": "onthessh::terminal::open_session",
    "data": {
        "addr": "127.0.0.1:2222",
        "user": "dyf",
        "passwd": "dyf",
        "rows": 24,
        "cols": 120
    }
}
The “method” tells the core module the API to be called. “onthessh::terminal::open_session” indicates that a session for remote Linux is to be created, and “data” is the data sent from the foreground.
Next, let’s analyze how the socket(socketJson) method operates internally:
socket = new Socket("127.0.0.1", 2222);

String head = String.format("%10d", json.getBytes().length) + "\r\n";   //length head

//send
OutputStream out = socket.getOutputStream();
out.write((head+json).getBytes());

//read length head
InputStream in = socket.getInputStream();
byte[] lenBytes = new byte[12];
in.read(lenBytes);
String lenStr = new String(lenBytes, "utf-8").trim();
int len = Integer.parseInt(lenStr);
//read body json
byte[] bytes = new byte[len];
in.read(bytes);
String body = new String(bytes, "utf-8");

return body;
For simplicity, the address and port of a Socket are hard-coded. After successfully creating the Socket, first send a 12-byte length unit, and then send the json data. The format of the length unit is roughly as follows:
" 94\r\n"
Here, 94 represents the byte length of the Json data. Fill in the space before 94 and add the ‘\r\n’ following it, making a total of 12 bytes. This approach of first sending a length unit and then the specific data is quite common in Socket communication. Its purpose is to facilitate the handling of the “packet sticking” issue. When a Servlet receives data sent by the core module, it also needs to first receive a 12-byte length unit.
The next article will introduce the detailed code of the front-end index.html.